Here are instructions on how to operate in the starts of Venla and Jukola relays.
- Make sure you have enough time for the Emit registration and Emit re-set. One must be at the registration 20 minutes before the start at the latest.
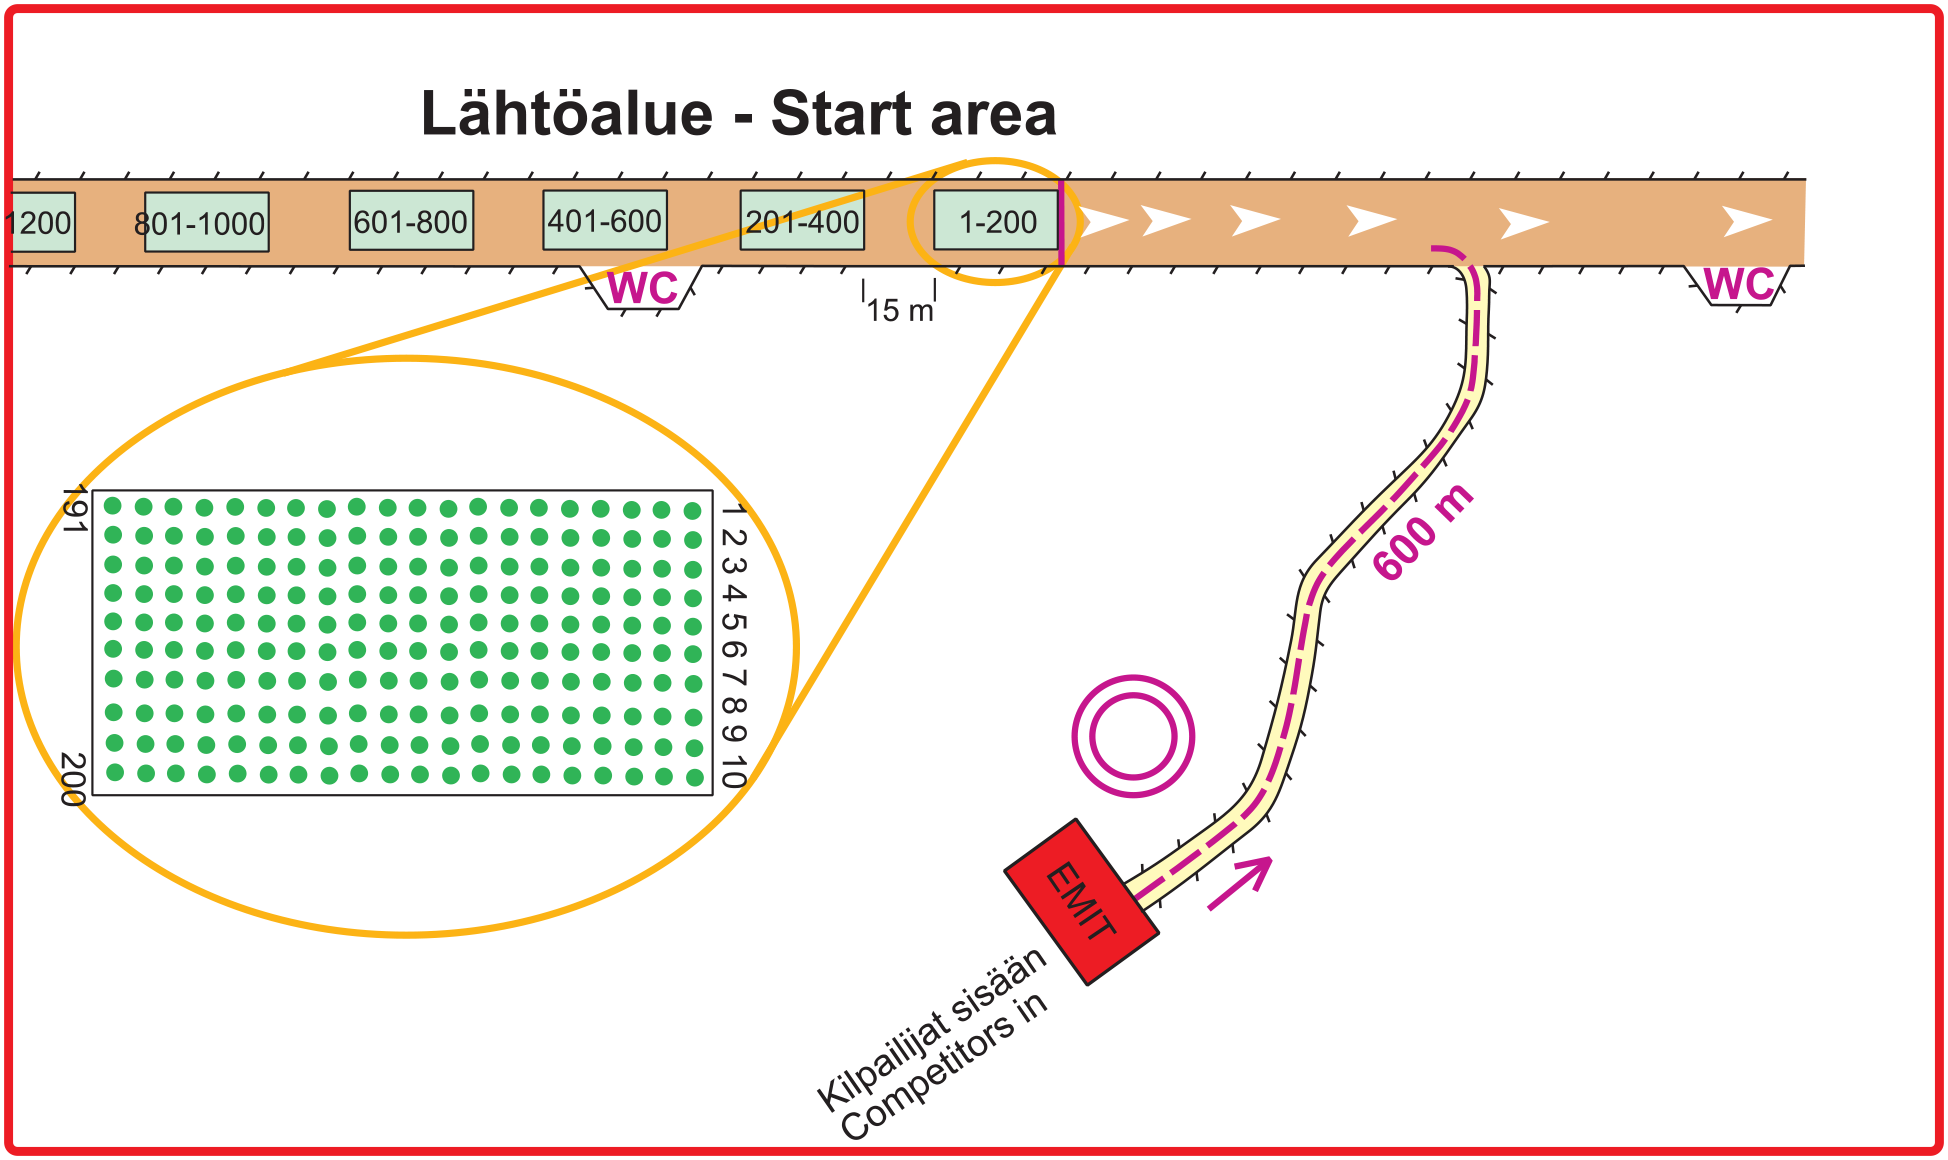
- After the registration, go straight to the start area (walking distance app. 600 metres). When warming up, check your own row’s position in the start grid. There are number signs at the ends of the rows. In addition, the start officials are wearing vests with numbers to show the row numbering.
- Approximately 15 minutes before the start, move close to your own start row and wait for further instructions from the loudspeakers.
- Approximately 8 minutes before the start, it is announced from the loudspeakers that you can go to your own start spot, matching your team’s bib number. Please do not step over the rows, move along them.
- Your start spot is indicated on the ground with your team’s number. Please wait at your own spot. Make sure that the number on the ground is your bib number.
- When announced through the loudspeakers, the distribution of the maps starts. In one row, there are 10 orienteers. There will be one official distributing the maps for two rows (20 orienteers).
- Make sure that the map you receive carries the number of your team. The competitor is responsible for taking the right map.
- Keep the map in front of your body in full sight until the start signal is fired.
- Do not open the seal of the folded map prior to the start signal. As stated in the competition rules, the team will be disqualified if the seal of the map is opened too early.
- Do not move before the start signal. The start signal is church bells. As stated in the competition rules, the start will be recorded and teams that false start or cause others to false start will be disqualified.
As you leave for your own leg, you must enter the start / changeover area through the entrance gate, wearing appropriate clothing, number bib attached with four safety pins and equipped with your Emit-card. In the start / changeover area there will be no storage facility for clothing or other gear. There will be toilets and a first-aid point.
Phase 1
Your shoes and number bib will be checked. The number bib must be attached carefully. Spike shoes are forbidden. Tip: You might want to put some tape on your knotted shoe laces.
Phase 2
In the entrance tent your number bib’s bar code will be read into the system. After this, you put your Emit-card onto the Emit-unit. Please keep your number bib in sight and your Emit-card ready, so that the entering will run smoothly and quickly.
Phase 3
In the Emit-reset your Emit-card will be cleared. If your Emit-card doesn’t work, you will be guided back to the entrance tent, where you can hire a working Emit-card or get yourself a working Emit-card from outside the tent. If you hire a card, you can pay it later at the competition info. If you get yourself a new card from outside the tent, remember to go through registration again.
Tip: Check if your Emit-card works beforehand. You can do this at the units next to the competition info and in front of the entrance tent. Your Emit-card is likely to work properly if the red light on the testing unit blinks.
Tip: Attach your Emit-card backup slip into your Emit-card with a small piece of tape.
Phase 4
The start of both relays will take place in Sarvingintie (a road). After the Emit-card registration and reset move briskly to the start area. The route is marked and there will be guiding officials. The start takes place on an asphalt road. The start area is narrow. Be careful not to crash with other runners!
In the start area follow the instructions from the loudspeakers. Make your way to your own start row in good time. There will be number signs at the ends of the rows. The numbers will be marked on the road as well. When the officials distribute the maps, it is the competitor’s responsibility to check that they get the right map. The folded map will carry the team’s number and the competitor’s leg number. Do not open the seal on the folded map before the start signal is fired. The start will be recorded. Tip: On the way to the K-point you’ll have plenty of time to read the map. Take your time on the marked route, don’t hurry too much.
Phase 5
When you finish your leg, choose the correct finish lane (corresponding your leg number). The correct lane will be shown to you by signs / by officials. You have to punch also in the finish! Punch your Emit-card the same way as in controls. Then give your map to the officials waiting.
Tip: Open your map wide before you hand it in to the officials.
Phase 6
How to find the map for the next leg runner: The map stands are equipped with number signs at the ends of the stands. At the end of the stand there is a sign showing which maps can be found in that stand (for example 300-1). The maps with smallest numbers are on the right of the changeover area, close to the changeover fence.
When you find the correct map, carrying your team number and the next runner’s leg number, take it by lifting it straight upwards from the bag (see the picture). Do not tear / rip! When you have the map, go to the changeover fence. At the fence, the teams with the smallest numbers are on the right end and those with the biggest numbers on the left end.
Tip: There are number signs at the changeover fence, indicating where your team’s next runner should be waiting.
If for some reason there is no correct map in your team’s map bag or if you have accidentally taken a wrong map from a wrong bag, you must immediately contact the INFO point at the right end of the changeover fence. There the problem will be fixed.